I absolutely hate waste. We are wasting a lot of resources in this country from bare necessities to entertainment items. This is even worse in the small electronics area. If a small electronics item gets broken most of us don’t even think of repairing it. There is a better, newer version out there that we want anyway, and it doesn’t cost that much. So, we dump the broken one and got a brand new one. I struggle with that mentality as I know I can repair them most of the time. Do I have time to tackle every single broken electronics item in my house? Not all the time, and I previously had resource constraints as well. I used to have one table that I did my coding and electronics projects on. Our garage is not a useful place as it is detached and not finished inside so there is no room in there for me to setup my electronics lab. I was clearing out my desk every time I worked on an electronics project, pushing away the monitors, keyboard etc. The problem is that the next morning when I needed to code, my desk was covered with components, soldering iron etc. That meant, cleaning it again. I think you got the drift.
Thanks to my wife, I now have an additional desk for electronics projects:

Now the lab is in order, I decided to start up with a repair work. I picked my broken Logitech Harmony 670 remote for this job. It is more than 2 years old and was in perfect working condition as far as the remote functionality goes. The problem arose when I try to update it with a new activity by connecting it to my computer. It just wasn’t syncing with my computer even though my computer detected it. Logitech wasn’t helpful as it was out of warranty. So I opened it up on the new lab setup. To open the remote, first remove 4 screws shown in the picture.

Use an iPod/iPhone Pry Tool (shown on the left) to pry open the case (shown on the right)
 |
 |
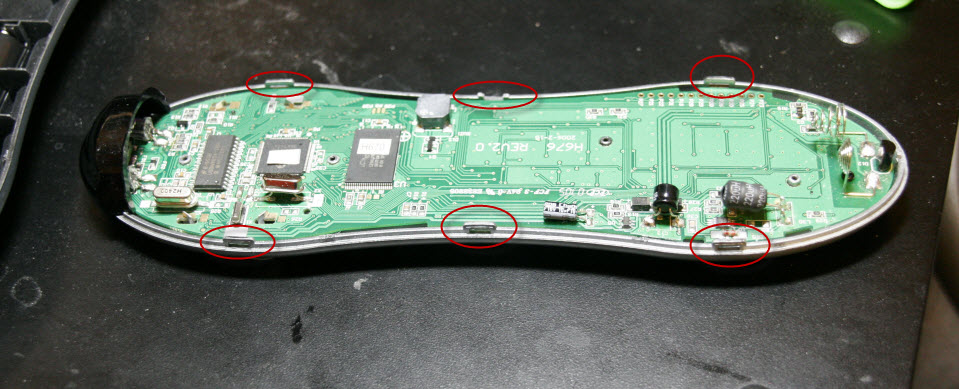
There are total of 6 plastic tabs that hold the case together as shown below:

I narrowed the problem down to the USBN9604-28M USB controller IC. It operates on a 24MHz clock but the oscillator circuit wasn’t generating the signal required. Since I didn’t have a way to test the crystal in a quick fashion I decided to replace it. That did not solve the problem. I realized that the C5 (15pF) cap was bad too (or that was the culprit to begin with). I replaced the cap as well. See below.

The unit worked briefly until I knocked it over my desk. Upon inspection I realized that Logitech did not solder the USB connector casing to the board at all. So I messed up the USB connection by knocking it over my desk as the USB connector got bent. After properly soldering all the connections and the casing to the board everything worked like a charm.

I spent about couple of hours working on the remote. I could’ve gotten a refurbished one for about $70 and a brand new one for about $120. But, this is not about the money. I got a great satisfaction by fixing it, and also prevented another electronics item to go to a landfill.
nice work. how did you open the 670 without breaking the case? All I can find is two screws in the battery case. Any help would be greatly appreciated.
Thanks
Thanks, See my updated post above. I posted pictures to show how I opened the case.
-Levent
Thanks, I spent hours looking how to take my 670 apart. I did not want to stick a screwdriver into the case blind — I could not tell if the 2 holes were for screws or not; and I had something rattling around inside after dropping it for the nth time. Now to see if I can cobble 1 fully working 670 from one that doesn’t display anything except the glow and the other that doesn’t have all the buttons working. I don’t suppose you have any specs on the lcd display? They seem impossible to find. Just lots of posts about it not working. Again thanks for taking the time to post the pics!
This is a great post. Just like you, I only go out and buy a new device if I cannot fix it. I am a tinkerer and my hobby is electronics & backyard inventing…:)
Well, I need a little help from you with regards to Harmony 670. I have two of them (both around 2+ years old).
First One: stopped synching with the PC. PC recognizes that a device has been added to the USB port (ding). But it fails to recognize it as a Harmony Remote 670.
Second One: Works fine with regards to the controlling part but the LCD is dying (partial letters, dim letters, etc…) on me. Hard to use it as a controller.
First I thought that I can reuse the LCD from the first one in the second one and I will salvage one remote. But, after reading your post, I am confident that I will be able to fix and salvage both the remotes.
My question to you is: Since you have had some experience with these remotes, do you have any suggestions for me…?
Thnx for your help.
First Remote:
If you have an oscilloscope, you can check to see if proper signal generated by the USB controller oscillator circuit. I guess you can also use a frequency counter as well. If you don’t have the proper frequency or the signal, check the components in the oscillator circuit. I’d replace the capacitors first and then the crystal. You can refer to the USB controllers datasheet for more info: USBN9604 Datasheet
Second Remote:
Refer to jrklein’s post. There is not much you can do if the LCD is cracked. I guess you can get a broken remote from ebay for parts and try to replace the screen.
Had the same exact problem with the USB connector not having been soldered correctly. Have also been frustrated about the concept of waste–we barely used the remote as my husband was never able to update the software with no USB connection. Thanks for taking the time to post directions and pics!!
Thank you for posting this information! I disassembled my H670 in hope of resolving a display issue with the LCD (every other horizontal line was blank). The ribbon contacts seemed to be in good shape, but the upper corner of the LCD appeared to be cracked.
The LCD is marked as follows: 727A-0701213-A-070222-16
Sharing in case this LCD P/N helps someone else with an H670 or unrelated device. Unfortunately, I could not find a source for a replacement LCD.
My 670 has no power from AAA batteries. The screen lights up fine when I plug in the USB to my PC, but as soon as I remove it, it goes dead. I have run the remote thorugh all the updates within the Harmony software but no luck.
When I opened mine, I saw that the USB connector was also lifted up, so I soldered it back down. I also cleaned and resoldered the battery connection points. But I have no oscilloscope, testing equipment or electronics knowledge! Do you have any suggestions?
My old 670 has been working fine (and still is!), but it took an unfortunate spill that knocked off the USB connector. It looks like I may be able to replace it, but I figured while I’m at it, I might as well replace it with a new connector as some of the tiny pins are slightly bent.
This looks like a direct replacement
https://www.digikey.com/product-detail/en/edac-inc/690-005-299-043/151-1206-6-ND/4312193
In addition, the top of the BUZ1 component came off and is broken. I’m not sure I really need the buzzer, but I figured I might as well replace that while I have it open. Do you know how to tell what the specs are of the buzzer? I’ve found a few that look near identical for size on digikey made by Soberton.
Thanks for the blog and pictures, they helped me easily open the 670.