I am a big fan of Microsoft Ergonomic Keyboards. I’ve been using them since Microsoft first released it 15+ years ago. Even though I am currently using a Goldtouch ergonomic keyboard, I like to switch things up so I bought a Microsoft Natural Ergonomic Keyboard 4000.
One feature I didn’t like about this keyboard was the zoom slider in the middle of the keyboard. I really do not get the point of it. I do not know who needs to zoom in and out of things so frequently that they would need a dedicated contraption for it. I would rather have a trackball or trackpoint kind of device in there instead.
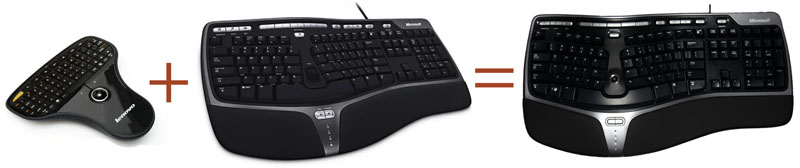
Well, if you are a hacker and if you cannot find it, you just make it!
I had a Lenovo multimedia keyboard lying around. Trackball of this device was the perfect size for my project.

So I took it apart.
Trackball unit with the silver colored trackball retainer:

The ball and the retainer is removed, trackball housing:

The plastic lens:

Optical receiver/camera:

I opened the keyboard to see if there were enough space for the whole circuit board under the zoom slider. There wasn’t:

Since there wasn’t enough space under the zoom slider for the circuit board in the keyboard, I had to extend the optical camera along with trackball housing so it would fit under the zoom slider. For that, I de-soldered the optical camera unit and extended it by using a piece of ribbon cable:


I removed the zoom slider, and checked to see if my new extended trackball unit would fit to the void created from removed zoom slider. It was a good fit.
I glued the trackball housing, optical camera and the plastic lens together with hot glue.

It was missing the led, which was still on the circuit board. I cut a piece of the circuit board that contained the led.


I extended this piece with some ribbon cable as well, and glued it to rest of the housing with hot glue. The cut piece of the circuit board made it easy to align:


I started modifying the keyboard. I made a whole for the trackball housing:

Check to see if it fit:


It was fitting but the screw points were protruding from each side just a little bit and preventing the operation of the “H” and the “G” keys. I trimmed the protruding parts.
It was the Bondo time:


After the Bondo is cured, I sanded it down to a semi smooth finish. I applied the Bondo glazing and spot putty to smooth it out ():


Prepped it for paint:

Painted:

I decided to use the “Back” and the “Forward” buttons on the keyboard’s wrist wrest for “right” and “left” click. These buttons were controlling a couple of micro switches.

I made a couple of modifications to disable the current functionality of the buttons. First, I cut one of the legs off from the buttons at the component side of the board:


Second, I isolated the common ground by cutting the trace line shown below in small circle. I extended cables from the trackball’s left and right click pads, and soldered to the keyboard’s board as shown in the bigger red circle below.

The Lenovo trackball unit operates at 3V (2xAAA batteries), and the keyboard operates at standard USB 5V. In order to adapt the voltage, I used a LP2950 cv3.3V voltage regulator like shown in the schematic below:

This setup not only reduces the voltage, but also limits the current.

After the power lines are soldered to the keyboard’s board, I placed the Lenovo trackball unit under the ribbon cables to a small empty space in the keyboard shown below:

After closing up the case, the whole unit looked like this:

Here is a closer look:

World’s first Microsoft Natural Ergonomic Keyboard 4000 with built in trackball!
Hi
I am in Australia which is neither here nor there I guess but… I was wondering what the functionality of this modified keyboard is like. I have sent the blog page to a guy here to see whether or not he might be able to do something similar for me as I have quite serious RSI in right shoulder/neck and a trackball dead centre of an ergonomic keyboard almost sounds like heaven to me. I am also looking at a barmouse but I think the profile of the microsoft 4000 might be a little high for it still cause always raise the barmouse up on something am thinking…….lol. The things we go through to study without pain!!
thanks
Jannine
Hi Jannine,
Modifying the exiting keyboard was a fun project and I used the keyboard/trackball for several months. Currently I am using Roller Mouse Free-2 with GoldTouch V2 keyboard. This is not a cheap combo, but it might be worth investing. You can get these cheaper on eBay.
My biggest advise to you is this: Change your typing habits every 6 months, change your mouse, keyboard, the hand you are using for mousing, and the way you are sitting.
Also, taking brakes from working and stretching is extremely important. You can use RSI Guard or WorkRave for reminders.
Good luck,
-Levent
I did a similar thing with my 4000. I used a thumb type trackball like this http://thumbs.ebaystatic.com/images/g/x9YAAOSwl9BWJjzD/s-l225.jpg
And integrated it into the wrist rest, just to the right of the back/forward buttons. I opened a hole in the wrist rest and the trackball unit just sits there nicely, poking out the top. Much less work but probably not as nice. I can just drop my left thumb down to the trackball without too much fuss. Also, instead of resoldering the back/forward buttons, I just remapped them in software using autohotkey. Works perfectly.