I recently bought the Contour Design ShuttlePRO along with ShuttleExpress to use it with Adobe LightRoom. The device itself is a great product, but the driver installation program didn’t work on my computer.
Upon executing the driver installation program on my Win7 x64 system, I received an error message indicating “Insufficient free disk space”. I had over 2TB (2000+ GB) of free space on my drive, so it was obvious that the disk space was not an issue. I have seen this problem in the past on an outdated WISE install system, the installation program wasn’t calculating the free space properly on large drives. So, I assumed that the same thing was happening to this installation program.
I contacted Contour Design support and explained the situation. They sent me another driver that is packed with the same installation system. Needless to say, it did not work due to the same error. After that point customer support was unresponsive; no acknowledgment of the problem, no apology for the inconvenience, nothing at all. 04/06/2013 Update: Contour Design has contacted me and let me know that a new installation program is in the works.
I also use other Contour Design products and I like them. I did not want to give up on Shuttle devices just because of a driver installation problem. So, I took matters into my own hands.
I was fairly certain that the installation was going to work on a system with smaller free disk space. If I could capture the installation, I could easily create my own version. The setup or install capture is a simple process. The capture program takes a snapshot of the system before and after the installation. It then compares these two snapshots to find out what’s changed on the system and creates a list of file and registry changes. So, I created a Win7 x64 virtual machine on my trusted VMWare Workstation. I dusted off my old WISE Installation System license and installed on the VM, and I performed a setup capture. The installation went well because the VM did not have terabytes of free disk space. I cleaned up the captured package (often OS makes changes unrelated to the installation during the snapshot process, those changes have to be removed) and compiled a brand new installation from it.
Performing these activities on a VM machine have some important benefits:
- The OS image was clean. Nothing else was installed. This assures a clean setup capture process.
- You can take VM snapshots and go back to any of the previous snapshots any time you want. I took a snapshot of the VM right after I installed the WISE install system. This allows me to go back to the unchanged state of the VM regardless what I do after the snapshot point.
I went back to my snapshot point several times and tested my installation. It worked flawlessly. Once I convinced myself that the installation package I created was stable, I installed on my actual system. Presto! My installation worked flawlessly and installed the Contour Design Shuttle drivers without a problem.
Although I achieved what I wanted (installing the drivers), I was not at ease. Because:
- I did not hear back from Contour Design acknowledging the issue, it was obvious to me that they were not going to do anything to resolve it. 04/06/2013 Update: Contour Design has contacted me and let me know that a new installation program is in the works.
- I happened to have a license for WISE Install Studio, but my already old version might not be useful in the future.
- I cannot just keep repackaging their installation every time they release a new driver.
I yearned for a more permanent fix.
DISCLAIMER: I will not be held responsible for any loss, incidental or consequential damage, or loss arising out of the installation, use (unauthorized or otherwise), errors, mistakes, accident, theft or fraud, destruction, or any part of the instructions below. Try at your own risk.
So, I decided to investigate the Contour Design’s installation program further. I first looked at it with the HexEdit (my favorite Hexadecimal Editor). It became immediately apparent that the installation file was packed with UPX. See Below:

I unpacked the .exe with UPX and ran it again. I received the following.

I wanted to get more information. So, I opened the executable with PE Explorer. In the resource editor I saw a couple of dialog boxes. One of the dialog boxes revealed the installation system used:

The Ghost Installer is a product of Ethalone Solutions Inc. The latest updated version (v4.8) was released on October 2009, and the prior version to that was released on March 2008. Not so good.
Since the Ethalone Solutions has not updated their product for about three and a half years, it was safe to assume that I was not going to receive a fix anytime soon. This gave me yet another reason to continue.
I decided to stop the installation from complaining about “Invalid package size” so I could continue with my investigation. I searched for “invalid_package” on PE Explorer’s disassembler view:

The highlighted portion of this code compares the previously known size of the package with the current size. If there is a match, the code jumps to L00437C93. Otherwise, it gets into the part that it throws “Invalid package size” message and quits. If we jump to the L00437C93 address regardless the comparison result, the installation should continue.
I am not going to get into the explanation of opcodes here. However, if you look to the left of the highlighted code, you’ll see the hexadecimal representation of the assembly code “jz L00437C93” which is “74 2F”. In short, this means: if the previous comparison (action) sets the zero flag, jump 0x2F (44 bytes) bytes forward. If we wanted to just jump 0x2F bytes forward, we use “jmp <address>” assembly code. This translates to “EB 2F”. So I just need to change one byte from “74” to “EB” and it would jump 0x2F bytes forward regardless the previous comparison.
If we search just for the “74 2F” in the executable, it is very likely that we are going to find many matches. So, I noted down 10 bytes starting with “74 2F” to search just to make sure I find a unique match: “74 2F 8D 45 B0 50 8B 45 FC 8B”
I opened the file with the HexEdit again and searched for the above hex:

I then changed the single byte from “74” to “EB” as shown below:

I saved the changes, quit the HexEdit and ran the program again:

*Grin*, I eliminated the package size check routine, but I still got the “Insufficient disk space” error message.
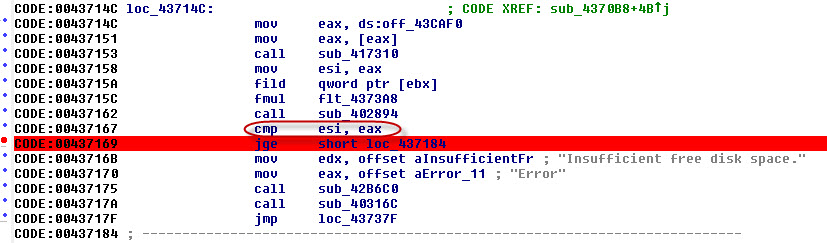
I figured this next step required a debugger along with a disassembler. I downloaded IDA Pro free edition from Hex-rays, installed it and opened the installation executable. I searched for “insufficient” and found the section of the code that handles free space check:

It was obvious that the comparison of esi and eax registers were there to compare the free space with the required space. The code with the red background is “jump if greater or equal to”, so if the esi is greater or equal to eax, the code would jump to 0x437184. Otherwise, it would continue and show the “insufficient disk” message. I placed a breakpoint to the “jge” and run the code in debugger:

Doh! This was unexpected. Somehow an exception happened in IDA Free when I try to debug the application. When I passed this exception to the program, I ended up losing control of the application. 🙁
I knew that I couldn’t use OllyDbg to debug the executable since the installer was calling an x64 Windows dll. I am not good at using WinDbg other than analyzing crashdump files. I decided to make my life easier, and downloaded the demo version of IDA PRO 6.4. It is a shame that this awesome debugger/disassembler is prohibitively expensive. The version that allows you to debug x64 code costs $1,129. 🙁
I opened the installation executable with IDA Demo, set the breakpoint on the very same “jge” command, and executed the executable. Registers showed the following when I reached the breakpoint:

At this point, I found the bug (explained below), but I wanted to figure out the origin of the value in ESI (0xA6323BD8). This supposed to represent the free disk space on my drive but it was not correct. I decided to find the place where the free space was calculated by the installation. I backtracked many functions and found out the location of the disk space detection:
This module calls the Windows API GetDiskFreeSpaceEx function and finds out the free space on the drive. I placed a breakpoint right at the address 0x417425 because I wanted to see if the API call was succeeding or not. If the API call is successful the return value is nonzero.
The return code was nonzero, and the free space was reported correctly by the windows API. However, the result was manipulated by the code circled above. Here is the explanation of what was happening:
- Windows API returned the free space as Long Integer (16 bytes long).
- This code got the hi portion of the DWORD returned by API, which was 0x0298, and multiplied it with 2^22 (4MB)
- Then it got the lo portion and divided it with 1024
- It added the results of step 2 and 3 to find the total free space.
- The result was then saved at [ebp+var_8].
The calculated value was far from being the correct value, but it would have worked if there was not a bug in the code.
I ran the code back where I found the “Insufficient free disk space” message. I wanted to make sure that the calculated free space value was not changing.

At this point the EAX contained 0x00000475 and ESI contained 0xA63238E4. So, the ESI contained the free disk space found. Therefore the EAX should contain the required free space. At first look, this should’ve worked, because 0xA63238E4 is bigger than 0x00000475. However, there laid the bug. The “JGE” command is for a signed integer comparison, and in the signed integer world 0xA63238E4 is not a positive number. It is a negative number and represents -1,506,658,076 in decimal. The author should’ve used the “JAE” command instead of “JGE”.
I had two options to fix the problem at this point. I could either use “JAE” command and correct the mistake, or bypass the free disk space check altogether. I chose the latter. The shuttle drivers use roughly 10MB of space, and if I had less than 10MB of free space on a drive, I would’ve had more problems than installing drivers.
I used the same method I described above at the disabling the package size check. All I needed to do was to change the opcode from “7D 19” to “EB 19”. I searched for “7D 19 BA B4 73 43 00 B8 DC 73 43” in the installation file using HexEdit:

Then changed “7D” to “EB”:

Saved the file, and ran the installation again:

Fixed the installation!
At this point, if I could not repeat the results on a different driver installation, all my work would have ended in vain.
So, I quickly grabbed two older version of the driver v2.81 and v2.72, decompressed them with UPX, and search the patterns I explained above. I found both patterns in both driver installation files. Great!
I decided to create a patch application, so I could patch these installers without using HexEdit. I was sure to forget about the process in 3-4 months time when I needed to upgrade the drivers.
I then created a simple application to automate the patching process explained above. You can download it here. 04/06/2013 Update: Contour Design has contacted me and let me know that their engineers are working to solve the problem. So, I decided not the provide the patch on my site. Please contact Contour Design Support if you are experiencing problems with your installation of Shuttle drivers.
You might ask why this is an ethical hack? The installation program was intended for all Shuttle device users. However, the bug in the installation system was preventing it from being installed on systems with large drives. This hack simply restores the original intention of the installation program on systems with large drives. A.k.a fixes a bug. I did not touch any of the original Contour Design driver files, only fixed a bug in the installation system. Also, I gained absolutely nothing other than regaining the functionality of my legally purchased product.
I hope it is clear why this is an ethical hack. Being a security professional, I adhere to very strict ethical standards. I worked with the Business Software Alliance in the past, and I take software piracy very seriously. Please do not put me in a position that you would regret by asking me to hack a software program.